Nothing in the published specification carries a corner pin retensioning interval, which is exactly why the task goes unrecorded on a lot of blocks. The same tool-free pin design that lets two or three people assemble a set in about 30 minutes leaves no torque figure to sign off and no fastener log to audit.
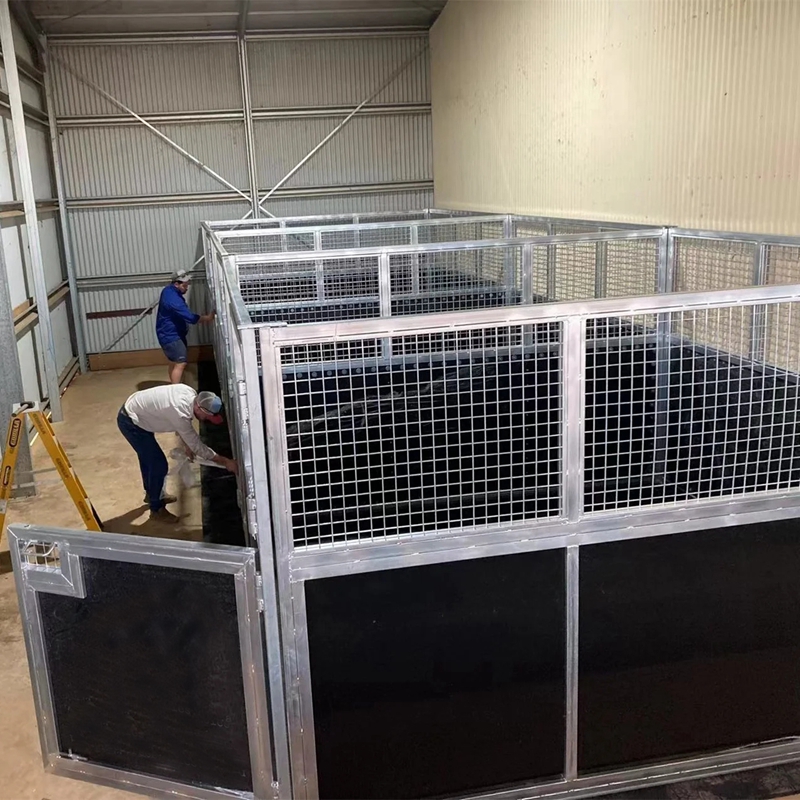
The pin is also the only adjustment in the joint. A wall panel is a 50×50×2.0 mm square tube frame carrying a 10 mm HDPE sheet, at roughly 200 kg. Once it is seated at a corner post, that pin is what holds the panel plumb and the door line true — and a new block moves from workshop-flat to site-flat inside its first weeks.
Key Takeaways
- A pin joint you can seat by hand leaves no torque figure to sign off, so the month-one check only happens if the owner or builder writes it in.
- Hand pressure on the top rail is the gauge: a panel that rocks, or a gate whose gap has changed, is the evidence.
- Count the joints before you walk the block. One stall is three wall panels and one door; a six-stall back-to-back run is eleven panels and six doors.
- A panel at about 200 kg puts its load into the corner post, so a loose pin transfers movement into the shared upright rather than into the ground.
- Re-tension at month one, then fold the same check into whatever routine maintenance you already run, and again after anything that shifted the block.
What the pin joint is carrying
A flat-pack block is not held together by glue or by a weld at every junction. The frames are welded in the factory — 50×50×2.0 mm square tube, with the lower section in 25×25×1.6 mm and the mesh front built from 4.0 mm wire on a 50×50 mm aperture — and the panels are then joined on site at corner posts with pins that seat by hand.
That means the pin is carrying three jobs at once. It holds two panel edges in the same plane. It keeps a 2200 mm front standing plumb when a horse leans across it. And it preserves the spacing a door needs to run: gates are 1150 mm or 1300 mm wide, and a sliding gate runs a 2950 mm track on twin wheels, so a corner that has drifted a few millimetres shows up first as a door that binds.
There is no adjustment screw behind it. The published design is deliberately the opposite: the pin seat does the tolerancing, which is why its state after four weeks tells you more about the block than any drawing does.
Why the first month is when it moves
A kit assembled in a workshop sits on a floor that was levelled for a building. The same kit on a yard sits on whatever the site gave it. Sand, hard-standing and gravel all settle differently under a load concentrated at the uprights, and the first weeks after stock move in are when that settlement runs fastest. It is also when horses are testing the fronts, the feeders and each other.
The panel material moves as well. A 10 mm HDPE sheet is specified as UV-resistant and rot-proof, and it spends an Australian summer in full sun and an Australian winter in the shade. The frame underneath is steel. Those two expand at very different rates, so a joint that was snug in March can be loose by April without anything touching it.
What the published documents do not do is promise a schedule. No re-tensioning interval, no first-service visit, no return-visit line item appears in the specification, in the quotation flow or in the after-sales commitments. Treat the month-one walk as something the owner or builder owns, and if you want it covered commercially, ask for it in writing while the enquiry is still open — replies come within six hours and quoting from drawings runs inside 24. The handover paperwork a builder should already be signing is set out in the post-installation inspection checklist for builders.
The retensioning walk, stall by stall
Work the block in the order the panels share corners, not in the order you painted the yard. Three passes, with a second pair of hands:
- Count first. Write the panel and door totals for the run on the sheet so nothing gets skipped, then start at a door end.
- Press, do not measure. Hand pressure at the top rail of each panel; whatever rocks gets dealt with before anything else is adjusted.
- Finish at the gates. Sight each gate top to bottom, because movement at a shared upright shows on both sides of it and a track fault rarely comes first.
| What you see | What it usually means | What to do |
|---|---|---|
| Panel rocks under hand pressure | Pin short in its seat after settlement | Re-seat, then press again and confirm it stops |
| Gate gap tapers top to bottom | Frame racked at the shared corner post | Tension both panels at that post before touching the track |
| Mesh front sits proud of the frame | One edge pulled out of plane at the pin | Check the seat at each end of that panel, not the loose corner alone |
| Pin will not seat by hand | Tube or seat damaged in transit or assembly | Photograph it and raise it as a parts item |
Two people make the walk short and safe. One holds the panel while the other seats the pin; a 200 kg sheet is not a job to lever alone, and levering is how a good seat gets distorted. Anyone moving a block without taking it down should repeat the same walk at the new site, for the same reason — the ground under it has changed, covered in moving an assembled stable without disassembly.
When a loose pin is a parts problem
Some joints will not come right by tensioning. A distorted pin seat, a tube that has been kicked out of round, or a panel that has moved in its frame will keep returning loose no matter how carefully it is re-seated, and forcing a pin into a damaged seat is how a maintenance item becomes a hole in a panel.
Raise those as parts, against the same reference you used to order. Corner posts appear in the published accessory list; ask whether pin hardware is stocked separately before assuming it is. A photograph of the damaged seat beside the panel it came from carries more weight than a written description. If the third-party inspection report for your batch is still to hand, work from that document — galvanising on these frames is specified as a factory minimum of 42 microns with the process run to AS/NZS 4680. The published terms do not say how coating loss at a scraped seat is treated, so get the supplier’s position in writing rather than assuming a claim.

Frequently Asked Questions
How often should corner pins be checked?
The published specification sets no interval. Site practice fills the gap: once in the first month, then alongside whatever routine you already run, and again after any relocation. Date the walk on the handover sheet so the next one has a baseline to compare against.
Do the pins need a tool to re-tension?
No. The published joint is hand-seated. If a hammer, lever or wedge is needed, stop: photograph pin and seat together and raise it as a parts question rather than forcing the joint back into place.
What does a loose pin do to an HDPE panel?
It lets the sheet work against the frame it sits in. A 10 mm HDPE panel is specified as rot-proof and bite-resistant, but a panel rattling in a loose joint is abrading at the contact points and no longer cushioning a kick in the way the design intends.
Should retensioning appear on a builder’s handover sheet?
Yes — dated, with the panel totals for the run and any joint re-seated. On a builder sale it also settles who owns month one, because the walk is a site item rather than something the factory performs.
Conclusion
A pin joint you can seat by hand is a good deal until something moves underneath it. The month-one walk needs two pairs of hands and no tools; how long it takes depends on the totals you wrote on the sheet, and it is the check that keeps each wall panel sitting where the drawing put it.
Write the count, the date and any re-seated joint on the same sheet the builder handed over. If you are specifying a block now, put the pin seat and the corner post in the enquiry while drawings are still being quoted.