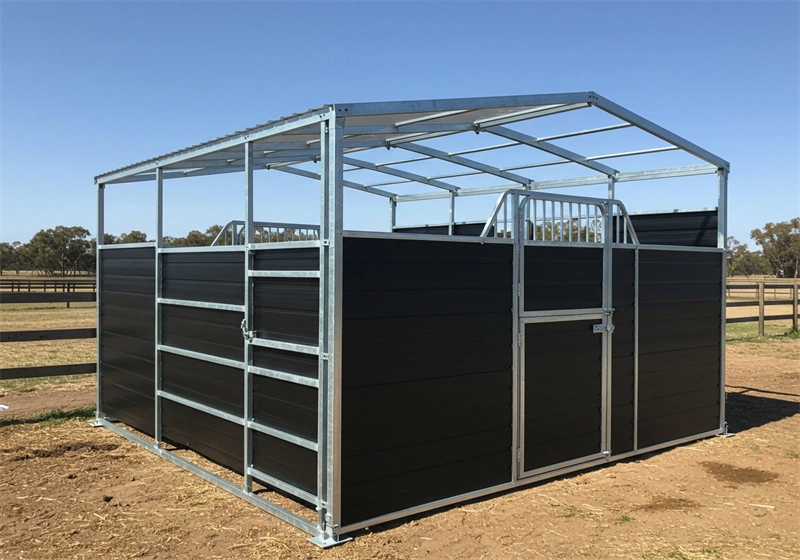
A portable horse stable from DB Stable is designed to be assembled by 2–3 people in around 30 minutes per unit, using tool-free corner pins. Two person stable assembly is therefore not a compromise — it is the way the system is engineered to go together. What separates a smooth build from a long one is rarely the people. It is the sequence: what gets staged where, what stands up first, and who does what while a panel is being aligned.
This guide sets out an assembly plan for importers, distributors and farm teams who will receive flat-packed consignments and erect them with small crews. It covers the staging work that happens before anyone lifts a panel, the build order around each bay, the role split between the two assemblers, and the configurations where you should genuinely add a third person.
Key takeaways
- Tool-free by design: corner pins mean no fastening tools in the basic assembly — 2–3 people, around 30 minutes per stable.
- Staging beats speed: panels laid out around the marked footprint in build order save more time than any technique during the build itself.
- One bay is 3 side panels plus 1 gate: the official configuration table runs from a single stable (3 panels, 1 gate) to a six-bay back-to-back block (11 panels, 6 gates).
- Split the roles, not the panels: one person positions and holds alignment, the other drives pins — alternating jobs wastes the rhythm.
- Know when three is right: roofed configurations and multi-bay blocks move faster and safer with a third pair of hands.
What the corner-pin system changes
Traditional stable construction starts with a tool hunt: spanners for bolts, drivers for screws, torque tools for tensioning. DB Stable’s assembly system removes that step entirely. Panels and frame members locate on corner pins and lock without fastening tools, which is why the published assembly figure is 2–3 people and roughly 30 minutes per stable — the connection points are designed to be seated by hand and checked by eye.
The design decision that matters for planners is different: because the connections are discrete pins rather than continuous fastening runs, the assembly is sequence-sensitive. Each panel depends on its neighbour standing already. That is the entire basis of the plan below — build in dependency order and the structure helps you; build out of order and two people spend their time fighting panels instead of seating them.
Stage the site before anyone lifts a panel
Staging is the cheapest time you will ever buy on a build. Three jobs, done in order, before assembly begins:
- Mark the footprint: lay out the full configuration on the ground — every bay, every gate position. A marked pad is the plan made visible, and it catches layout mistakes while they still cost a chalk line instead of a standing panel.
- Lay out panels in build order: move panels from the stack to positions around the footprint, roughly in the order they will be used, with gates and front-wall components placed at their bay openings. Handle this while the delivery crew or machinery is still on site.
- Clear the work circuit: the two assemblers will walk the perimeter of the bay repeatedly. Remove strapping, packaging and offcuts from that circuit before the first panel goes up.
The staging rule of thumb: if a panel has to be moved more than a few metres during assembly, staging has failed. Every metre of mid-build carrying is time two people spend not assembling — and the 30-minute figure assumes material is where the sequence needs it.

The build sequence around each bay
A single DB Stable bay is 3 side panels plus 1 gate; adjacent bays share panels, which is how the counts in the configuration table stay economical. The table below is the official configuration data — worth printing and pinning to the container at delivery.
| Configuration | Side panels | Gates | Planning note |
|---|---|---|---|
| 1 stable | 3 | 1 | Two people, one pass |
| 2 stables (adjacent) | 5 | 2 | Shared panel halves the second bay |
| 3 stables | 7 | 3 | Stage both ends before starting |
| 4 stables | 9 | 4 | Consider a third person from bay 3 |
| 5 stables | 11 | 5 | Work one end to the other, no jumping |
| 6 stables (back-to-back) | 11 | 6 | Build one row fully, then mirror it |
Within a bay, the dependency order is inherent to the product: side panels stand before the front wall, the front wall before gate hardware, and the roof — where specified — goes on last. For back-to-back blocks, complete one full row before starting the mirror row. The shared spine of panels is what makes the second row fast, and it only behaves that way if the first row is complete and pinned.

The two-person role split and the 30-minute rhythm
The efficient split is by role, not by panel. One person positions: lifts the panel end, walks it to vertical, holds it against the located corner pins and calls the alignment. The second person drives: seats the pins, checks the panel is plumb against the ones already standing, and releases only when the connection is home. Then both move to the next panel and swap only when the work genuinely changes character — such as moving to gate hanging, where the positioner becomes the holder and the driver becomes the fitter.
Two habits protect the rhythm. First, plumb as you go: correcting a lean on the third panel is a quick job; correcting it on a completed block is a rework job. Second, complete each connection before touching the next panel. Half-seated pins are the assembly version of an unpaid debt — the structure carries them quietly until it suddenly does not.
For teams that want the walkthrough before the truck arrives, the installation video below shows the complete sequence on a real unit. Buyers should also confirm what installation documentation ships with their kits — our portable horse stable pages list the standard kit contents, and the supplier vetting checklist includes the documentation questions that separate factories that plan your build from those that just ship boxes.
When two people is not enough
The 30-minute figure belongs to the standard bay configuration. Three situations justify a third person, and honest planning means naming them at the scheduling stage:
- Roofed configurations: roof members and sheeting add lift height and an extra alignment axis. A third person on the ground feeding and stabilising turns a slow two-person job into a safe three-person one.
- Multi-bay blocks from four bays up: the per-bay average stays low, but total time on site and panel-handling volume grow. A third stagier keeping the build face supplied keeps the two assemblers assembling.
- Confined or awkward sites: tight access, sloping ground or existing infrastructure around the pad can turn routine panel handling into a planned lift.
Note what is not on that list: unloading. Moving a flat-packed consignment from delivery point to staging positions is a separate task with its own equipment needs, and it should be finished — not in progress — when assembly starts. Blending the two is a common cause of lost build days on small sites.
Frequently Asked Questions
Do I need power tools for assembly?
No. The corner-pin system is tool-free by design, which is the basis of the 2–3 person, 30-minute assembly figure. A level for plumb checks is useful, but nothing in the basic build needs power.
How long does a six-bay back-to-back block take?
The published figure is around 30 minutes per stable with 2–3 people, so a six-bay block is a multi-hour job, not a single-bay repeat. Build one row fully, then mirror it, and stage all 11 panels and 6 gates before starting.
Should assembly and unloading be done together?
Keep them as separate tasks. Finish unloading and staging — with machinery or delivery crew still available — then start assembly on a cleared pad. Blending the two is a common cause of lost time on small sites.
Can one person assemble a stable alone?
The system is specified for 2–3 people. Some steps can be done solo, but panel positioning and pin seating are designed to happen together, so plan on a two-person crew as the minimum.
Conclusion
Two-person assembly works when the plan respects the system: stage every panel before the first lift, build in dependency order around each bay, split positioning from pin-driving, and add a third person for roofs and four-bay-plus blocks. The 30-minute-per-stable figure is real, but it belongs to crews whose material, footprint and sequence were settled before they started.
Print the configuration table, walk the pad with the footprint marked, and schedule unloading and assembly as separate sessions. Your build day will feel shorter — and your panels will stand straighter for it.